How to Install a Slat Privacy Screen System
Posted by Lee Benson on 30th Mar 2026
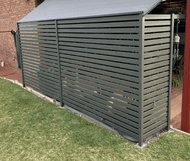
Aluminium slat privacy screens have become a go-to choice for modern Australian homes wanting privacy without neglecting their own sense of style. They strike the perfect balance between privacy, airflow and clean architectural style, and they can be used in so many applications – from enclosing a boundary, screening off a patio or creating a feature wall.
A slat system offers flexibility that traditional fencing simply can’t match, and the best part is that with the right preparation and a methodical approach, installing a slat privacy screen is absolutely achievable as a DIY project.
Here at Outback Fencing, we’re committed to helping our community find and install the best fencing options for their property. While our main focus is supplying fencing products, we’re also experienced at installing all the materials we stock. Below, we’ll walk through the full process of installing a slat privacy screen system step by step, from measuring and digging, all the way through to locking in your final top cap. You can also watch a quick video explanation here.
Step 1: Plan Your Layout and Measure the Run of Your Privacy Screen
Before you pick up a shovel, take the time to properly plan your privacy screen layout.
Start by determining the total length of your screen and where each post will sit. As a general rule, the distance between posts should not exceed 2450mm. This will make sure your slats remain rigid and don’t flex or sag over time. Mark each post position clearly on the ground. This is also the stage where you decide:
- Where your fence starts and ends
- Whether you’ll include corners or returns
- If you’ll be tying into an existing wall or structure
Remember, proper planning can save a lot of time and hassle when you go to install the privacy screen, so a little extra care here will make every step that follows much easier.
Choose Your Slat Style:
Slat systems are typically standardised at 65mm, with the focus instead being on style and finish. Two of the most popular options include:
- Aluminium coloured slats – perfect for a sleek, modern look that pairs well with contemporary homes and is customisable over a range of colour palettes
- Timber-look slats – offer the warmth and natural appearance of wood, without the maintenance that real timber requires
The 65mm slats strike the perfect balance between style and function, offering glimpses through the panels while maintaining privacy and enhancing residential security by limiting direct visibility. Your choice comes down to the overall aesthetic you’re trying to achieve. Coloured aluminium delivers a sharp, architectural feel, while timber-look finishes soften the space and blend beautifully with gardens and outdoor areas.
Step 2: Install a String Line for Accuracy
Once your layout is marked, install a string line between your start and end points.
This line should be set at the desired height of the bottom of your first slat. It serves as your visual guide to keep everything level throughout the run. Make sure the string line is:
- Taut (no sagging)
- Level (use a line level if needed)
- Parallel to your boundary or structure
Getting this right ensures your finished screen looks clean and professional and not slightly angled from one end to the other.
Step 3: Dig Post Holes and Set Your Posts
With your positions marked, dig your post holes. For most slat systems, holes should be approximately 600mm deep and wide enough to allow for proper concrete coverage.
Place each post into position and fill the hole with concrete. Use a spirit level to ensure the post is perfectly vertical (true) on all sides. Take your time here, as if your posts aren’t straight, the rest of the installation becomes much harder to correct later. As the posts are set with concrete, it makes this privacy screen one of the most durable fencing styles available.
Step 4: Snap in the Infill to Set Your First Slat Height
Once your posts are secure, install the infill piece at the base of the channel. This infill sets the starting height of your first slat and ensures consistency across the fence. If needed, the infill can be easily cut to size to suit your exact layout or ground conditions.
Step 5: Install the First Slat (The Most Important One)
Your first slat sets the tone for the entire fence, so it needs to be perfect. Again, take your time here. If the first slat is even slightly off, every slat above it will follow that same line. To install:
- Push one side of the slat into the post at an angle
- Then pull the opposite side down into place
- Use a spirit level to ensure it’s perfectly horizontal
Step 6: Understand the Patented Friction System
One of the biggest advantages of modern slat systems is the patented friction-fit design. Each slat locks into place using internal legs within the extrusion. This means you can simply slide your slate in for a snug and secure fit. There will be no rattling in the wind, no need to screw every slat into position and a faster and cleaner installation.
Step 7: Install Spacer Infills (Especially for Corners)
Spacer infills are used to maintain consistent gaps between slats, which is particularly important around corner posts. Standard spacer sizes include 9mm spacing and 20mm spacing. However, if your layout requires something different, spacers can be cut to size to suit custom gaps or design preferences.
Step 8: Build Out the Remaining Fence Sections
Once your corner sections are established, continue building out the rest of the fence. Alternate between installing slats and adding spacer infills. Work your way up the panel until you reach the desired height. By this stage, the system becomes quite repetitive and much faster to install.
Step 9: Install the Locking Clip
Before installing the top cap, insert the locking clip. This small but important component will make sure:
- Slats are secured in position
- Movement is minimised over time
- The overall structure remains tight and stable
Step 10: Fit the Top Cap
Finally, install the top cap. Position it over the posts and slats, then give it a firm nudge – typically with a rubber mallet or light sledge – to secure it into place. This step finishes the fence both structurally and visually, giving it that clean, polished look. With the post tops sealed using caps, debris and contaminants are kept out, making the aluminium slat privacy screen system one of the best low-maintenance fencing options available.
Packing Up
Installing a slat privacy screen system is all about getting the fundamentals right – accurate measuring, straight posts and a perfectly level first slat. Once those elements are in place, the rest of the process becomes straightforward and even enjoyable. With a smart design, durable materials and flexible configurations, you can create a fence that not only looks great but performs for years to come.
If you’re planning a project and want to make sure you’re using the right components or layout, the team at Outback Fencing can help you get it right from the start. Get in touch to discuss any questions about the installation process or our products on offer.