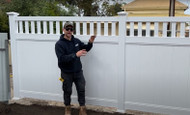
How To Install a Full Privacy Slat Top Fencing Panel
Posted by Lee Benson on 29th Sep 2025
If you’re looking for maximum backyard privacy while still keeping things stylish, a Full Privacy Slat Top PVC Fence is the way to go. With its solid panel design, you’ll enjoy complete coverage from neighbours or street view, while the subtle slat top finish adds a modern touch.
One of the main differences between PVC and timber fencing is that PVC won’t warp, rot or fade over time, making it a long-lasting investment for Aussie homes. And with our slat top range, you also get the advantage of it being one of the best low-maintenance fencing options, just a quick wash down to keep it looking fresh.
Best of all, PVC was made for Aussie conditions, from the UV onslaught in Sydney’s suburbs to creating a private space in Melbourne’s busy inner west or for Perth properties and the harsh conditions they face – this fence style is a perfect fit.
Even better? You don’t need to be a master builder to install one. With the right tools, a little preparation and some patience, you can bolt your fence directly to a concrete slab using base plates. No digging required!
In the video and blog below, we’ll show you how to install your full privacy slat top fence step by step, from setting your base plates to securing the top rail.
Materials and Tools You’ll Need
When you order a Full Privacy Slat Top Fence from Outback Fencing, your box will include everything you need for one panel:
- Premium PVC rails (bottom, mid and top)
- Aluminium insert for strength
- Slat toppers for the decorative finish
- Full privacy infill panels
- Post covers and caps
You’ll also need these tools and supplies to get the job done:
- Base plates and bolts
- Hammer drill (14mm drill bit for 12mm threaded rods, 120mm long)
- Spirit level
- Measuring tape
- String line & pegs
- Angle grinder (for cutting posts)
- Texter/marker
- Washers (if concrete is uneven)
- Builders' glue (for securing caps)
- Rubber mallet
Step by Step Process To Install a Full Privacy Slat Top Fencing Panel
Step 1: Position and Mark Your Base Plates
Start by working out where your fence line will run. Place a base plate at each end, then use a texter to mark the bolt holes.
Once marked, drill into the slab using a hammer drill. Blow away the dust before adding your liquid anchor, as this helps the bolts hold tight.
After installing both end plates, run a string line between them to make sure all other base plates line up perfectly. If your concrete isn’t level, slip a washer or two under the base plate to get things sitting flush.
Step 2: Install and Cut Your Posts
With the base plates bolted down, slot in your fence posts. Because these posts are designed to go into the ground, you’ll need to trim them to fit the base plates properly.
Measure 50mm up from the bottom rail line. This gives enough clearance for the decorative cover (around 40mm high) and ensures smooth alignment. Cut each post to length with an angle grinder, then double-check your measurements before moving on.
Step 3: Add the Decorative Post Covers
Before installing panels, fit the domicile/double post covers around the base plates. These covers hide the fixings and give a neat, polished look. They simply click into place – just keep the seam aligned with the fence line so it’s not visible from either side.
Step 4: Assemble the Bottom Rail
Open up your fencing box and start with the bottom rail. Inside, you’ll find the aluminium insert and slide this into the post to provide strength and prevent sagging. Make sure the rail clicks securely into the post slots. If you’re working with a shorter or cut section, you may need to trim the rail to size.
Step 5: Insert the Privacy Panels
Now, it’s time to add the solid panels to boost your family’s privacy effect:
- Start at one end by slotting the first infill panel into the bottom rail.
- Continue adding panels, clicking them together tongue-and-groove style.
- Use the end-cap pieces to seal the sides neatly and prevent any see-through gaps.
Step 6: Install the Mid Rail and Slat Toppers
Once your PVC fencing privacy panels are in place, attach the mid rail. Hold it at a slight angle and guide it over the tops of the infills, then snap it into the posts.
Next, add the slat toppers above the mid rail. These are designed to slot in one by one. Work methodically – sometimes a gentle tap with a mallet helps. Don’t fully secure the end caps yet. Keeping them loose makes it much easier to slide the slat toppers into place.
Step 7: Fit the Top Rail
The top rail is the trickiest part, but also the most satisfying.
- Clip one end into the post.
- Slot in the first couple of slats underneath the rail.
- Work along the panel, guiding each slat into place.
- Tap the rail down gently with a mallet until everything clicks together.
Once you’ve done one, the rest of the panels will feel much easier.
Step 8: Secure the Caps and Finish Up
For the final step:
- Glue on the post caps using builder’s glue. This ensures they don’t get lost over time.
- Give your new fence a quick clean down to remove dust or fingerprints. Check out our guide on how to clean and maintain PVC fencing for the full rundown on looking after your stylish new fence.
Step back and admire your brand-new Full Privacy Slat Top Fence – strong, stylish and built to last in tough Aussie conditions. Also learn installation of a semi-privacy Hampton style PVC picket fencing panel.
Packing Up
And there you have it, a complete guide to installing a Full Privacy Slat Top PVC Fence using base plates. No digging, no hassle, just a professional finish that adds instant privacy and boosts the value of your property.
This fence style is ideal for many common garden styles, backyards, pool areas, or boundary fencing where you want both strength and a sleek modern look. Pair it with matching Trex composite decking or PVC planter boxes for a cohesive Hamptons-inspired design.
If you’re based in Sydney, Melbourne, Perth, or anywhere across Australia, Outback Fencing can supply everything you need for a seamless installation. Our team is here to help you choose the right panels and provide expert advice so your fence not only looks great but lasts for decades.